Building your own VERSA-LOK retaining wall can be a rewarding experience. Below is a brief summary of installation steps and additional resources to help you complete your VERSA-LOK landscaping project.
Important
Walls that support heavy loads or exceed four feet in height require special soil reinforcement and often professionally designed plans. Please consult a qualified engineer if unsure about any construction, site or soil conditions. Also, be sure to check local building codes before wall construction or design.
Step By Step Installation
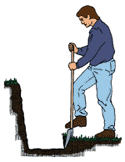
Step 1: Leveling Pad Preparation
VERSA-LOK walls should be placed on a leveling pad of well-compacted gravel, crushed stone or coarse sand approximately 6" thick and 24" wide. The first course of VERSA-LOK units should be embedded below grade approximately 1/10th of the exposed wall height. Excavate to lines and grades you've established for your wall, allowing for the leveling pad and unit embedment. Place and compact leveling pad material. It may be helpful to add a thin layer of sand to create a uniform, level pad.
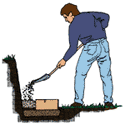
Step 2: Install Retaining Wall Base Course
Place VERSA-LOK units on prepared leveling pad. As you proceed, level each unit front to back, side to side, and with adjacent units. Leveling is critical at this stage, so take your time! Align straight wall sections using a string line or by sighting down the grooves on unit tops. If your wall has a corner, begin at the corner and work out from there.

Step 3: Backfill Your Wall
Using native soil, backfill and compact behind and in front of the base course to a level even with the grade in front of the wall. Next, place and compact 12" of drainage aggregate behind units.
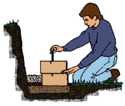
Step 4: Install Successive Retaining Wall Courses
Stack units one course at a time. Set units back 3/4" and insert two pins in front holes of units so they fall into the rear slots of the units beneath. Tap pins with another pin and a mallet to properly set them. Place and compact drainage aggregate behind each course as it is completed.
NOTE: In addition to the requirements shown above, many walls require horizontal layers of geogrid reinforcement for stability. The maximum, stable unreinforced wall height in the best conditions is 4 feet and can be lower, depending on soils, loading, slopes or terraces.
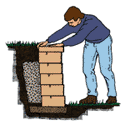
Step 5: Install Caps
After completing the top course of your wall, install VERSA-LOK caps, either with a slight overhang (recommended), set back or flush with the wall face. Use VERSA-LOK concrete adhesive to secure cap units to the wall.
NOTE: Retaining walls taller than 4 feet typically require a design prepared by a qualified professional engineer (P.E.). Be sure to check your local building code requirements.
Additional Installation Resources
Online Retaining Wall Installation Videos
The videos we have posted on YouTube at www.youtube.com/user/RetainingWallSystems provide an introduction to proper retaining wall installation. These videos are available in English and Spanish and can also be requested from VERSA-LOK on DVD for viewing on any DVD player.
VERSA-TECH Online Academy
The VERSA-Tech Online Academy is a self-paced course on the VERSA-LOK web site that provides a detailed overview of segmental retaining walls, site planning, and installation steps.
Retaining Wall Design and Installation Guides
Our Design & Installation Guides for VERSA-LOK Standard and Mosaic® systems are available in downloadable PDF format and as printed manuals.
Important: Walls that support heavy loads or exceed four feet in height require special soil reinforcement and often professionally engineered designs. Please consult a qualified engineer if unsure about any construction, site or soil conditions. Also be sure to check local building codes before designing or constructing a retaining wall.